
Grilling is an art form that requires precision and patience. Learn how to start a pellet grill (5 easy steps) to enjoy the best flavor from your outdoor cooking experience.
Whether you are new to grilling or have been around for years, it’s important to understand how pellet grills work to get the most out of them.
With these five simple steps, you can quickly learn how to start a pellet grill and achieve perfect results every time!
How to Start a Pellet Grill?
Follow along as we discuss preheating, adding pellets, setting temperature levels, placing food on the grill properly, and cleaning up afterward – all essential components of starting a successful cookout with your trusty pellet grill.
Here are the 5 simple steps to start a pellet grill.
1. Preheat the Grill
Preheating your pellet grill is essential for a successful grilling experience. It ensures that the temperature is even and consistent throughout the cooking process, which helps to create delicious meals every time.
To preheat your pellet grill, either a portable pellet grill or a pellet grill with a stand, start by setting the temperature to your desired level. This can be done using either manual or digital controls on most models of pellet grills.
Once you have set the temperature, wait for the indicator light to turn green before adding any food to the grill. This will ensure that it has reached its optimal cooking temperature before you begin cooking.
When preheating a new pellet grill, it’s important to keep an eye on it as temperatures can vary from model to model and batch of pellets used in each cooking session.
Some may take longer than others, depending on how much heat they can generate and retain over time.
If you find that your pellets are burning too quickly or not reaching their target temperatures fast enough, try adjusting the settings accordingly until you achieve satisfactory results.
It’s also important to remember that different types of food require different levels of heat when being cooked on a pellet grill; this includes meats such as beef, pork, chicken, and fish, as well as vegetables like potatoes and onions.
To get optimal results with these foods, make sure you adjust your settings accordingly. Hence, they reach their ideal internal temperatures without overcooking them or drying them out in any way, shape, or form.
Finally, once you’re finished preheating your pellet grill and have achieved optimal temperatures for whatever type of food item(s) you plan on grilling up next, don’t forget to clean up afterward.
A clean grate will help prevent flare-ups while ensuring all remnants from previous cooks are removed properly so there won’t be any lingering odors or flavors left behind during future sessions.
Once the grill is preheated, it’s time to add pellets to begin grilling. Next up, we’ll go over how to add pellets for a delicious barbecue.
2. Add Pellets
Adding pellets to your grill is an important step in the grilling process. High-quality pellets are essential for achieving the best results, so make sure you use only top-notch products.
Pellets come in various flavors and types, such as mesquite, hickory, applewood, cherrywood, and more.
Each type of pellet will impart its own unique flavor onto whatever food you’re cooking.
For example, if you’re making burgers, sausage, or steaks on the grill, then using mesquite pellets can give them a smoky flavor that pairs perfectly with grilled meats.
Once you have chosen your desired type of pellet, it’s time to add them to the hopper on your grill.
Make sure that all vents are open before adding any pellets, as this will ensure proper airflow throughout the chamber and help prevent flare-ups from occurring during cooking.
Once all vents are open, slowly pour in your desired pellet level into the hopper until it is full but not overflowing.
If too many pellets are added, they may clog up the venting system, which could lead to dangerous conditions while grilling, so be careful when filling up your hopper.
Adding pellets to your wood pellet grill is an important step in the grilling process.
To get started, ensure you have the right amount of pellets for your desired temperature, and then proceed to set that temperature.
3. Set Temperature
With a digital temperature control panel, you can easily adjust the temperature range to your desired level.
Depending on what type of food you are cooking, you may need a higher or lower temperature setting.
For example, if you’re grilling steak, it should be cooked at a high temperature (around 400°F), while chicken and vegetables require a lower temperature (around 350°F).
It’s important to remember that different types of wood pellets will burn hotter than others.
If you want to add more flavor to your grilled foods, try using mesquite or hickory pellets, as they tend to burn hotter than other varieties, such as oak or cherry.
You can also mix and match different types of wood pellets for even more unique flavors.
When setting the temperature on your pellet grill, ensure it doesn’t exceed 500°F as this could cause flare-ups, leading to unevenly cooked food and potential fires.
Additionally, keep an eye on the internal thermometer to ensure that the heat remains consistent throughout the entire cooking process. This will help guarantee perfectly cooked meals every time.
Finally, don’t forget to preheat your pellet grill before adding any food to it. This helps eliminate any excess moisture from previous uses and ensures that all surfaces are evenly heated up before cooking, so nothing gets burned or overcooked during the process.
Once you have set the temperature, it’s time to place your food on the grill and start cooking.
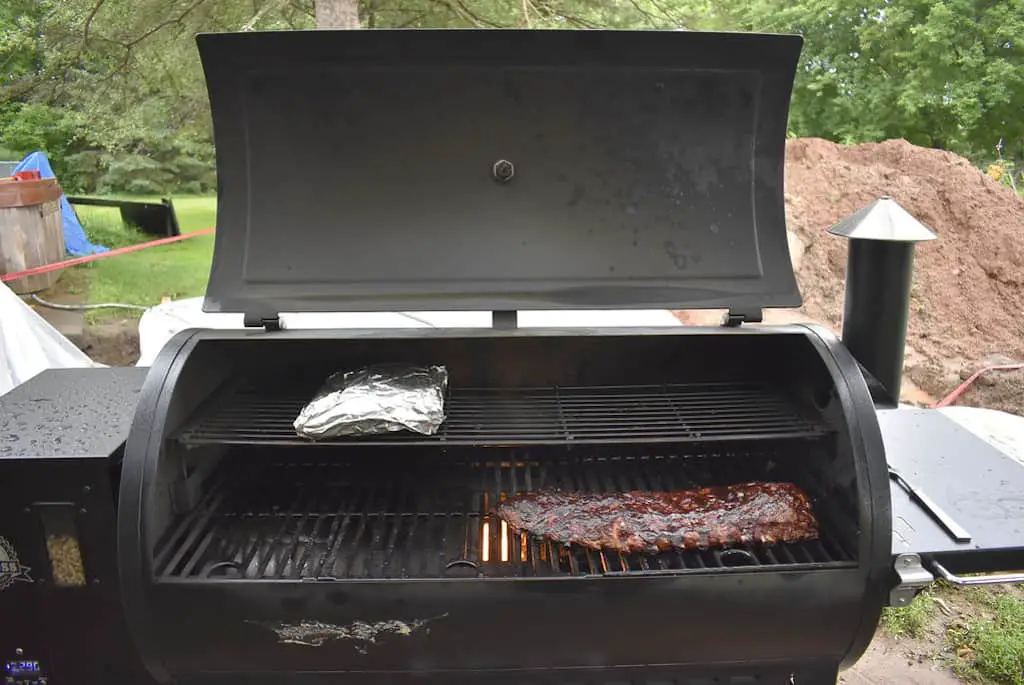
4. Place Food on Grill
When it comes to grilling, one of the most important steps is placing your food on the grill. You must take care when doing this to ensure even cooking and delicious results. Here are some tips for properly placing food on a pellet grill:
1. Preheat Grill: Before adding any food to the grill, ensure it has reached its desired temperature. This will help ensure that your food cooks evenly and thoroughly.
2. Position Food Properly: When placing items onto the grate, be sure to leave enough space between them, so they don’t stick together or burn unevenly due to overcrowding. If possible, try arranging foods with similar cook times near each other so they can all finish at once without having to move them around too much during cooking time.
3. Close Lid: Once you have placed your food onto the grate and arranged it as desired, close the grill lid of your pellet grill so heat can circulate evenly throughout the chamber and cook everything thoroughly from all sides simultaneously.
To ensure proper cooking temperatures for different types of meats (e.g., poultry should reach an internal temperature of 165°F/74°C), use a digital thermometer probe inserted into the thickest part of the meat before removing it from the heat source. This will give you an accurate reading of the doneness level before serving dinner.
Once your food is on the grill, make sure to adjust the temperature and cook it to perfection. Once you’re done, don’t forget to clean up so that you can enjoy your meal even more.
5. Clean Up
When it comes to cleaning up after grilling, the most important thing is safety.
Before beginning any clean-up process, ensure that your grill has cooled down completely, that all food has been removed from the cooking surface, and that all unused pellets have been removed from the grill.
This will help prevent any potential burns or fires caused by hot surfaces.
Once your grill has cooled down, begin removing ash and debris from inside or around the outside of the hopper itself.
If you have one available, a vacuum cleaner can be used for this task; otherwise, a damp cloth can be used to wipe away excess ash and debris.
Be sure to dispose of these materials appropriately, such as in a metal container with a lid that is placed away from combustible materials like wood or paper products.
If grease buildups are on your grill grates, use either a wire grill brush or steel wool pad to scrub them off before wiping them down with warm soapy water using a sponge or cloth rag.
Once finished, rinse off any remaining soap residue with warm water from your grill grates and dry thoroughly before storing away until the next time you need it again for grilling purposes.